Showing posts with label Brunch. Show all posts

Thursday, August 13, 2020

Peanut Butter and Jelly Muffins

These muffins are absolutely delicious, especially when still a little warm! Next time I make these I think I will try to add a bit of chopped fruit and a sprinkling of nuts on top to be fancy!

Peanut Butter and Jelly Muffins
from Parigi Bistro in Dallas via Ellise Pierce (Cowgirl Chef) - THANK YOU SO MUCH!

makes 8 muffins

1 cup or 72 grams All-Bran cereal
1 cup whole milk
1 large egg
1/4 cup or 57 grams butter, melted and cooled
½ cup or 100 grams light brown sugar
½ cup or 120 grams peanut butter
1/3 cup chopped nuts of your choice (I used pistachios.)
1 cup or 120 grams whole wheat flour
1 teaspoon baking powder
¼ teaspoon baking soda
½ teaspoon sea salt
8 tablespoons jam (I used Bonne Maman's Strawberry Preserves.)

Preheat oven to 375. Line a muffin tin with paper liners.

Pour the milk and All-Bran cereal in a bowl and set aside while you prepare the rest of the batter.

In a large bowl, mix together the egg, melted butter, brown sugar and peanut butter. Stir in the milk and cereal mixture and the chopped nuts.

In a medium bowl, whisk the flour with the baking powder, baking soda, and the salt. Add this all at once to the rest of the ingredients and stir only until combined. 

Fill the muffin liners with 1/4 cup of the batter, I used a disher for ease. Then  spoon in one tablespoon of jam, and then add another 1/4 cup of the batter on top of the jam. Bake for 27 minutes, turning halfway through, until the top feels firm and is slightly brown and crunchy around the edges. Let cool for 20 minutes and enjoy.

Sunday, August 9, 2020

Blueberry Bran Muffins


These are a lighter version of a traditional bran muffin, using wheat bran rather than wheat germ and with the addition of blueberries, a perfect pairing. I love the Huckleberry Cafe in Santa Monica and having their cookbook is such a treat since traveling during covid times is limited for us.

Makes 12 muffins.

1/2 cup + 2 tablespoons butter or 140 grams, melted and cooled
1/4 cup or 55 grams brown sugar
1 teaspoon Diamond salt (or 1/2 teaspoon other kosher salt) 
1 large egg, slightly beaten
6 Tablespoons avocado oil (or other neutral vegetable oil)
1/4 cup maple syrup
1/4 cup honey
1 cup or 130 grams all-purpose flour
1 cup wheat germ or wheat bran, toasted to a deep brown in the oven before use in the batter, (spread evenly on a rimmed baking sheet at 350 degrees for about 10 minutes)
1 teaspoon baking soda
1 cup plain Greek yogurt (or plain non-Greek yogurt, or sour cream, creme fraiche, etc.)
2 cups or 300 grams blueberries
Sugar for sprinkling on top (brown sugar, sparkling coarse sugar, or granulated sugar that's been dampened with a little water and placed in clumps - makes a nice crunchy sugar top!)

Preheat oven to 350 degrees. Add liners to a muffin pan. The tall liners work best so you can really pile the blueberries on top of each muffins. I used these liners

Melt the butter in a large glass mixing bowl in the microwave for a little over a minute and then let the butter cool. Whisk in the brown sugar and the salt. Then whisk in the egg, oil, maple syrup, and honey. Add the flour, wheat germ or bran, and the yogurt until just conbined. Evenly divide the batter between the muffin liners and then top the batter with the blueberries. Sprinkle with sugar.

Bake for 20 minutes, let cool slighly before serving.

Sunday, January 17, 2016

Jalapeño Corn Cakes

I didn't have cornmeal. I tried to make my own, using grits and my food processor, but that was a big fail. Obviously, all I needed was a quick grocery store trip, but somehow I kept finding other pressing matters, like chores, that got in the way. Hours after the breakfast I'd planned, I was starving! Finally, I made this beautiful masterpiece and now several days later I'm still in love with it! The pancakes are hearty, so I'd recommend serving 1-2 with a poached egg instead of 3, but I can also tell you there are many other ways to serve this. Try them alone with butter, with butter and honey (thank you, Melissa Cook), in place of a corn tortilla and with taco meat, lettuce and tomato, like a tostada. Save the leftover pancakes and pop them in the toaster to heat them up. Tear them up, toss with a little oil and bake for a few minutes and you will have croutons. Any way you would eat cornbread! Writing about them just makes me want to whip up another batch.

Jalapeño Corn Cakes

Adapted from recipe by Dennis Kum of Big D's Grub Truck in New York City/Food Truck Road Trip A Cookbook by Kim Pham & Philip Shen with Terri Phillips

3/4 cup (75g) all-purpose flour
1/3 cup (33g) masa
1/3 cup (57g) cornmeal
1/4 cup (48g) sugar
1 Tablespoon (12g) baking powder
1/2 teaspoon salt
1 cup milk
2 large eggs
1/4 cup avocado oil (use the kind you like)
1 cup (151g) corn (I used thawed frozen)
1/3 cup (60g) jalapeños, canned with seeds, chopped

Combine dry ingredients in a bowl. Combine milk, eggs, and oil in a small bowl and then pour into the dry ingredients and stir until combined. Add corn and jalapeños. Heat a large, non-stick skillet or well-seasoned cast iron skillet over medium heat (you may need to adjust the heat depending on your stove) and when hot, pour 1/4 cup of the mixture per pancake (or any size you like).

Tip from Dennis Kum: Place the cakes on a towel-lined plate, covering with an additional towel to keep warm. (Why didn't I know this tip? I tried it, works GREAT!)


Love,

Wednesday, October 28, 2015

Celebrating the One Year Anniversary of Donna Currie's Make Ahead Bread!

Cheese Ball Rolls

Dear Lauren, 

As I've told you many times before, Donna Currie is an incredible baker, cook, and all-around person. I have thoroughly enjoyed baking from her book, Make Ahead Bread: 100 Recipes for Melt-in-Your-Mouth Fresh Bread Every Day, which celebrates its one year anniversary Wednesday, November 4. 

Donna breaks down every recipe into baby steps over at least two days so even beginning bread bakers will have success. Take the recipe I've highlighted for you here. I've never made cinnamon rolls before, yet my dough was fantastic! I mean look at it! If I can do this, so can you!   

In addition to these rolls, I just want to tell you about some of my other successes with this book that have now become staples in my kitchen.


Sweet Bubble Loaf - I followed Donna's instructions and I looked at the unbaked results on Day 1. I was concerned. How in the world would these little dough balls turn into something amazing? Yet, they did! I think of this loaf as a cross between cinnamon bread and monkey bread. It's better than either!


Grandma Pizza - I've made this so many times you thinks it's "my" recipe! No, it's Donna's! My favorite toppings are Muir Glen Pizza Sauce, grated Dubliner cheese (untraditional, but so flavorful!), and Boar's Head pepperoni. I go very lightly on the toppings because it's the "bread" that is the real star of this pizza show.


Gluten-Free Seed and Nut Bread - We have a neighbor whose mother must eat a gluten free diet so he is always looking for a good gluten free this or that. This loaf is a wonderful nut bread. It could be used for french toast but we really liked ours buttered and toasted. It's wonderful straight out of the oven too! Had I been served this, I would not have known this was a gluten free bread!


Crisp Sesame Breadsticks - I'm planning a party at my home in November and these breadsticks will provide an edible centerpiece. And bonus - these breadsticks will keep in the pantry for weeks in the unlikely event I have leftovers!

Basic Pizza Dough (not photographed, I am SO SORRY!) - I read and re-read this recipe. Are you kidding me? You literally throw all the ingredients in a ziploc bag, zip it, and then squish and smush the ingredients around for a minute. That's it? No kneading? No mess? I admit, I had low expectations for this. I've put a lot more effort into pizza dough in the past and it never tasted very good to me. But what was there to lose? It's so easy! I will tell you this. I made a pizza with this dough and it was a thing of beauty. Thin crust that holds the ingredients without bending, yet is flavorful and tender to the bite. Keeper.


Cheese Ball Rolls
by Sandra
Adapted from Blueberry and Cream Cheese Buns with Lemon Zest from Make Ahead Bread by Donna Currie

For the Dough:

3 1/2 cups bread flour, plus extra for kneading and rolling
2 1/4 teaspoons active dry yeast
1/2 cup instant mashed potato flakes
1/4 cup nonfat dry milk
1 1/2 teaspoons kosher salt
4 Tablespoons unsalted butter, room temperature
1 egg, slightly beaten, plus water to equal 1 1/2 cups total

For the Filling:
One recipe of a cheese ball of your choice, I used Nettie's Cheese Ball (see below) but a double recipe of this would be another excellent choice.


On Prep Day:

1. Butter a 9" x 13" glass baking dish. 

2. Make the cheese ball. Set it aside and keep it at room temperature for easy spreading.


3. Combine all dough ingredients in a mixing bowl and then knead for 10 minutes until dough is elastic. You can use a stand mixer with a dough hook if you like, I didn't. 


4. Cover the bowl with plastic wrap. Let sit until the dough has doubled in size, about one hour in a warm room. (Tip: When you begin making this recipe, preheat your oven to 180°F and as soon as it has preheated, shut the oven off and open the oven door. Set the covered bowl of dough in the oven to rise. If your house is already warm - 70 to 80 degrees - this step is unnecessary.)


5. On a clean, dry work surface, spread a little flour and pat the dough into a rectangular shape. With a rolling pin, roll out the dough until it is approximately 12" x 16". With an offset spatula, spread the cheese ball mixture evenly over the dough, leaving about a 1" edge on the long side free of cheese ball mixture.


6. Starting on the opposite long side from where you left the dough free of cheese ball mixture, loosely roll up the dough, jellyroll style. Cut into 1" rolls. You will end up with 12, but if your end rolls are small you might end up with 13. This is fine.


7. Place the rolls in the baking dish 3 across and 4 down. If you have 13 rolls, place the two smallest side by side as if they are one. Cover the pan and refrigerate overnight or up to 24 hours.


To Bake:
1. Take the rolls out of the refrigerator and preheat the oven to 350°F
.


2. Bake the rolls for 40-45 minutes. If the rolls seem to be browning too much, tent the pan with aluminum foil for the rest of the baking period.


3. Cool in the pan for 10 minutes and then serve. Can be served as they are, with sausage and eggs, or with butter and fig spread.*  


4. These rolls are best the day they are baked. Unlike any other bread I know of though, you can reheat these one at a time for 20-30 seconds in the microwave and the roll's texture does not suffer. Try it and see what you think. We refrigerated these rolls and every day for 3 days had another and another, all of them reheated in the microwave. 


Nettie's Cheese Ball

by Sandra
Adapted from Nettie's recipe that my friend Tamela shared with me

2 8-ounce cream cheese, softened

2 cups sharp cheddar, shredded
1 teaspoon fresh lemon juice
1/4 cup beer
2 - 3 Tablespoons green bell pepper, minced
1 teaspoon salt
1 teaspoon Worcestershire sauce
4 dashes cayenne pepper
2 Tablespoons pimentos, minced
2 green onions (both white and green parts), minced
1/2 cup nuts of your choice, finely chopped (optional)

Mix all ingredients together in a bowl until well-combined. Set aside.

If you are making a cheese ball with this recipe, rather than the Cheese Ball Rolls, mix all ingredients except the nuts together and form a ball. Roll in the nuts. Refrigerate from several hours to overnight before serving.


Love,

P.S. I now consider my obsession with this fig spread to be lifelong. You've seen it, I know you have. It's in the cheese section of many grocery stores. You can try to substitute fig preserves or fig jam, but it's not even close to the same. This goes very well with these delicious Cheeseball Rolls or with the Sweet Bubble Bread. Or in a spoon. Yum yum.

Sunday, October 18, 2015

The Cake that Got Uncle Preston to Bake

Dear Lauren,

I happened to make this cake about a week before we received a visit from Uncle Preston. It was so delicious, I decided to make one for him too. And he thought it was so fabulous, he asked me to teach him how to bake one. I taught him and I mailed him a bundt pan so he can bake one for himself back in California.

Lemon Cardamom Zucchini Bundt Cake
adapted from Back to the Table

2 large zucchini, ends cut off and discarded, the rest shredded
zest from 1 lemon or 1 orange
390 grams of all-purpose flour
2 teaspoons ground cardamom
1 teaspoon baking powder
1 teaspoon baking soda
2 cups sugar
1 cup avocado oil (or vegetable oil you like)
3 large eggs
2 teaspoons vanilla extract
1 cup pecan (can be chopped if you like, I throw them in just as they are in the bag)

Preheat the oven to 350 degrees. Spray Baker's Joy* (NOT PAM) in a bundt pan and set aside. Use a box grater or a food processor and grate your zucchini. Place the shredded zucchini over several paper towels to dry out a bit. Sprinkle the lemon zest over the zucchini.

Whisk the flour, cardamom, baking powder and soda in a bowl and set aside. Whisk the sugar, oil, eggs, and extract in a bowl and add to the dry ingredients. Mix well with a large spoon**. Add the zucchini, the lemon zest, and the pecans and mix well. Add the mixture to the bundt pan and bake on the rack in the lower third of the oven for 50 minutes. Test for doneness with a skewer. If the skewer comes out clean, the cake is done. Ovens vary, my cake takes one hour to bake.

Love,

P.S. *If you can't find Baker's Joy where you live (and I sincerely hope you can), butter the bundt and then flour it. Tap out the excess flour. This method is second best to Baker's Joy.
P.P.S This recipe is mixed by hand. *When you first start stirring in the wet ingredients with the dry ones, you might think the batter is too dry. Keep stirring, it will come together just fine with a little work. The only equipment you need is a bundt pan (I love this one!), a zester, and (in my opinion) a kitchen scale to measure the flour. If you want to measure the flour using cups, add 3 cups instead of 390 grams.

Sunday, July 20, 2014

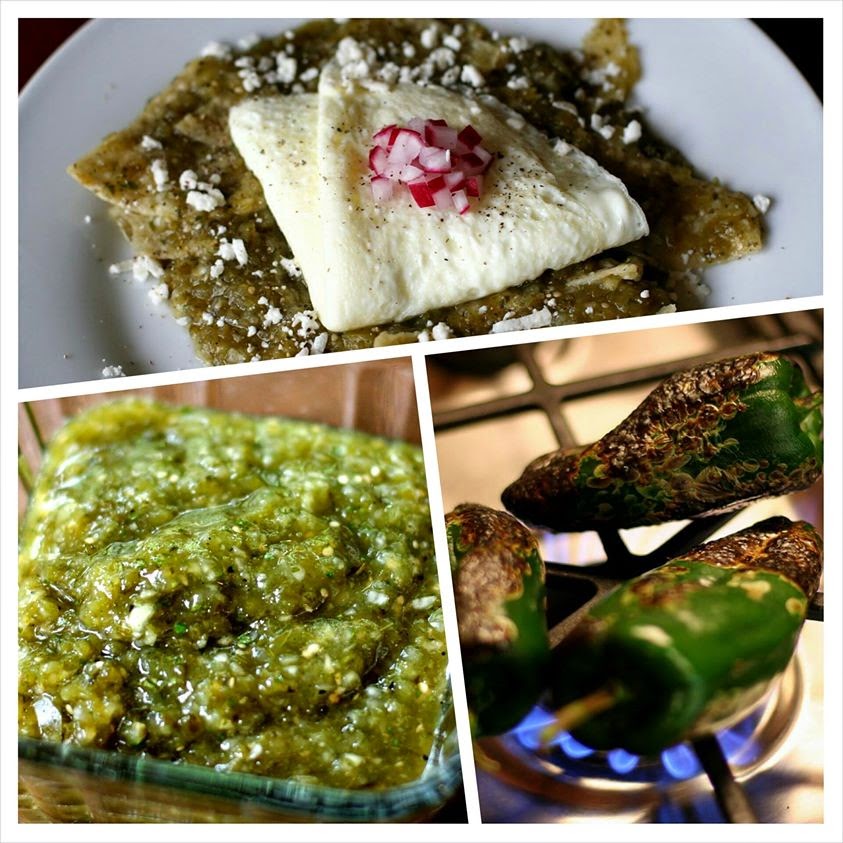
Chilaquiles

Dear Lauren,

The first time I ever had chilaquiles, I made them. I'd rather have something new in a restaurant first and then try my hand at it so I know what I'm aiming for. Wouldn't you? But, that fall the allure was just too great because I'd read that making chilaquiles with Thanksgiving turkey was a great way to use up leftovers and I loved the idea of it! The reality was even better and I became a big time chilaquiles lover from that day forward! I suggest you put chilaquiles on your list for Thanksgiving leftovers, too. Or, you can make them with rotisserie chicken or eggs, like I did today.

The green salsa is wonderful. Put it on your list of salsas to make and not just for chilaquiles. As you can see, the color of the salsa is excellent! So vibrant and pretty! Tastier than any green salsa I have ever made. 


Chilaquiles
Adapted from Secrets of the Best Chefs (Jessamyn Waldman Rodriguez, Founder, Hot Bread Kitchen, New York City


For the tomatillo salsa:
1/2 pound tomatillos, husks removed, washed
3 Poblano chilies, skins charred and removed, seeded and deveined
3 Tablespoons chopped cilantro
1 small onion, chopped
Salt to taste

1 Tablespoon olive oil
Corn tortilla chips or strips*
4 fried eggs, or 8 egg whites made into 4 egg white omelets
Radish, sliced or chopped
1/4 cup cilantro, chopped
4 ounces queso fresco or cotija cheese, grated
Mexican crema or sour cream (optional)

Add the tomatillos to boiling water and cook until the tomatillos are soft. Drain. Add all tomatillo salsa ingredients to a blender or food processor and blend until mostly smooth. Add salt if needed.

In a saucepan, add the salsa and 1/4 cup of water over medium heat and bring to a simmer. Add tortillas strips or chips and cook for about 1-2 minutes until they have softened. Divide the mixture between 4 plates and top with egg and radish. Serve hot

*To make your own tortilla chips: Preheat your oven to 350°F. Get out a rimmed baking sheet and cover it with a sheet of parchment paper to make for an easy clean up. Stack your tortillas and cut in half. Stack them again and cut them in 1/2-inch strips along the short edge. Place the tortillas on your baking sheet and pour the oil on them. Toss them til evenly coated and then spread the tortilla strips in a single layer on the sheet. Bake for 4-5 minutes til crispy. Watch closely so you don't overcook them. Set aside. (You can also cut your corn tortillas in triangular shapes if you wish.)

Love,

P.S. Lauren, do you remember that first year I made chilaquiles with turkey leftovers? We lived in Valencia and I loved that house and Starwood Place, our street! Loved it, still my favorite!

Monday, February 17, 2014

Moist Blueberry Scones with Lemon Glaze


Dear Lauren,


We are back in full swing for Cook My Book (Round FOUR! Can you believe it?) and when I read Gary's cookbook, Tyler Florence's Real Kitchen, I noted that Tyler recommends that men serve these scones to their women in bed! WOWZA! Is this the Real Housewives round? Unfortunately for me, I totally forgot to tell Dad Tyler's tip and now he's out of town for the next 7 days so I decided I would go ahead and make these this morning. Why do I make things like this when I am the only one here?

Trouble. Serious trouble for me and my battle with the scale.

The scones are delicious and exactly as Tyler describes - NOT dry, NOT crumbly. In other words, delicious! Look, you need to understand, I have been looking for this exact scone recipe for years. YEARS! Do you remember the bakery in Valencia, CA called S&S? They made the only scones I've ever really loved and every once in a while I make a new scone recipe hoping against hope that I find one just like I remember theirs, moist! This is it.

I've eaten about 14 bites. Please, someone come over and save me from ME!

I didn't change much in Tyler's original recipe. I now consider him a genius.

Moist Blueberry Scones with Lemon Glaze
slightly adapted from Tyler Florence's recipe in Tyler Florence's Real Kitchen

2 cups flour
1 Tablespoon baking powder
1/2 teaspoon salt
2 Tablespoons sugar
5 Tablespoons unsalted butter, cold, cut in teaspoon and then quartered
1 cup heavy cream
1 cup fresh blueberries + a tablespoon or so of flour

Lemon Glaze:
2 large lemons, freshly squeezed
2 cups confectioners' sugar, sifted
1 Tablespoon unsalted butter
1 lemon's worth of zest, finely grated as with a Microplane Grater/Zester

Preheat oven to 400.

Sift first four ingredients together. Use a pastry blender to cut the butter into the dry ingredients. When the butter/flour mixture looks like a coarse blend, add the heavy cream just until the dough comes together. If the dough is too dry* add more heavy cream a tablespoon at a time until the dough comes together but is not wet.

In a separate bowl, toss blueberries with a little flour. This will prevent the blueberries from sinking to the bottom of the scones. Carefully fold the blueberries into the scone batter.

On a lightly floured surface, shape the dough into a rectangle that is about 1 to 1 1/2 inches thick. Cut into scones by cutting the dough rectangle in half, then in half again and then cut each quarter into triangles. Place triangles on a rimmed baking sheet lined with parchment paper. Bake for 18-20 minutes until golden brown.

While scones cool, make the glaze by combining all ingredients in a microwave safe bowl until all of the sugar is dissolved. Then microwave on high for 30 seconds, remove from microwave and stir with a whisk. This glaze recipe is for a thin glaze. If you prefer a thicker glaze, only use the juice from one large lemon.** When the scones are mostly cool, drizzle glaze on top of scones and serve.

Notes: 
*When I made the scone batter it was too crumbly to come together and I was out of heavy cream at that point so I put a couple more splashes of half and half and that was all it needed.

**I could never get the glaze to look like the photo in the cookbook which is a real shame because the photo in the cookbook was beautiful. My glaze was thin despite adding more and then even more powdered sugar. I gave up because you know what? It tasted great!

Love,

Monday, September 9, 2013

Prune Cake

Dear Lauren,

Prune cake. If you can't say this without snickering or thinking of prunes as a laxative, you can call this Dried Plum Cake. In fact, I insist on it.

This cake is delicious as a dessert with powdered sugar and whipped cream on top, but it's also wonderful for breakfast with a little butter. It tastes a little like a bran muffin! Bran! There is a consistent theme in this post, is there not?

Sorry.

Monday, August 26, 2013

Twice Baked Almond Croissants


Dear Lauren,

I love sugar cubes. Just thought I'd mention that. Sugar cubes are special, just like having overnight guests. Now that I'm a grown-up, overnight guests make me as happy as having a sleepover did when I was little.

Monday, July 22, 2013

Carnitas and Zucchini Hash

Dear Lauren,

I don't know, there's just something about the word "hash" that I just don't like. So when people say they made or ate hash, I politely smile and say yum, but my heart's not in it. I am happy for them, of course, but I don't want a bite. It's hash!

But, earlier today I was thinking about what to have for lunch and I pulled out the leftover carnitas. Heavenly. I knew I had some zucchini. My favorite. What else? I decided to fire up the cast iron skillet and throw some diced carnitas in the pan and then I decided I would shred a zucchini and toss that in there, too. As I watched it cook I thought, hmmm...this is hash! Untraditional, yes. But hash all the same. I let it cook 'til it was browned in spots, then I dumped it all on a plate and spooned some fresh pico de gallo on top. I sprinkled it with a little lime salt. Then I remembered I had Mexican Crema in the fridge - hooray! So the hash got a tablespoon of crema on top.

This is the best hash I've ever had. The only hash I've ever had, and the only hash I've ever been tempted to try. It's delicious and will be a regular way to use any carnitas leftovers in the future.


Carnitas and Zucchini Hash

2 ounces carnitas, chopped (pork tenderloin, beef or chicken will work just fine!)
1 large zucchini, shredded
lime salt, optional
pico de gallo (see below), or use your own or a little salsa
Mexican Crema, or sour cream if that's what you have

Heat a cast iron skillet over medium-high heat. Add the carnitas and cook for about 1 minute and then add the shredded zucchini. Cook 2-3 minutes, or until some of the zucchini starts to char a little. Sprinkle with a little lime salt, or coarse kosher salt, or no salt - you decide. Put the mixture on a plate and top with pico de gallo and a little crema. Serve.

Pico De Gallo

2 tomatoes, diced

1 sweet onion, diced
1 bunch cilantro, chopped
1-2 jalapeno or serrano pepper(s), diced fine
1/4 lime, juiced - more if you need it

Stir above ingredients together and keep it in the refrigerator and use it on everything. If you like less cilantro and more of the other ingredients, make it that way!


Love,

Wednesday, July 10, 2013

The Answer is Always Bacon


Dear Lauren,

This all started when I asked my friends, my cooking friends in Cook My Book, what I should use as a substitute for hazelnuts in a salad I had planned to make today. I should have known what Gary's answer would be. I should have known, but his answer took me completely by surprise. And I should have suspected, when I asked the question in our Facebook group, that the answer would come back in seconds flat.

Bacon.

Monday, October 22, 2012

Beignets


Dear Lauren,

When Dad and I were dating, we went to New Orleans many times. I really don't know how many times. Probably more than three. Maybe eleven. Maybe seventeen. But definitely not over eighteen. 

Monday, October 15, 2012

Bacon, Egg, and Tomato Pie

Dear Lauren,

About a month ago I told you I was part of 37 Cooks and that we were in the middle of a Pie Challenge. What I didn't mention is that I was working night and day on the 37 Cooks project to get it up and running. It's a really neat story how 37 Cooks came to be. It all started in our basement, in the room we call The Downstairs Costco and wow did it take off from there. Some things are just meant to be and I feel like 37 Cooks is one of those meant to be things. It really is my baby and I have been tending it night and day and as a result no letters to you! Sorry!

Wednesday, August 15, 2012

Happy 100th Birthday to Julia Child!

Dear Lauren,


Sour Cream Coffee Cake.

I've been making this your whole life. The same recipe!